A. Physical Quantities
Physical quantities is a physical property of a phenomenon, body, or substance, that can be quantified by measurement. A physical quantity can be
expressed as the combination of a magnitude expressed by a number and a unit. There are two types
of quantities; base quantities and derived
quantities.
Base quantities are fundamental physical
quantities that are not defined in terms of other physical
quantities.
The seven base quantities of the International
System of Quantities (ISQ) and their corresponding SI units and dimensions
are listed in the following table.
The base quantities have the following characteristics:
1. They are not derivations of other quantities.
2. They can produce or derive other quantities.
Derived quantities are the derivations or combinations of the base quantities.
Here are some example of derived quantities:
B. Unit and Dimension
Unit is a quantity used as a standard of a measurement. Unit helps us
to know the exact quantity of the measurement result.
Let's take an example!
Annie went to the market last Thursday. There, the seller how
much sugars she needed. She said, "I need 5 rice, please!" Of course,
by saying that Annie has made the seller confused. But if she said," I
need 5 kg of rice, please!", the seller could directly give it to her
without being confuse.
Why this thing could happen? It's because unit states an
exact value as the standard of things. By saying kg, the
seller will understand that she need 5 kilos instead of 5 pieces of rice.
Units among every countries are different. Indonesia uses rupiah,
Malaysia uses ringgit, and some others. In order to make an
effective way for the economic circulation among countries, scientists created
an International system of units. The SI units is units on the base quantities.
Dimension is an expression of the character of a derived
quantity in relation to fundamental quantities, without regard for its
numerical value.
Dimensional analysis is useful method for determining the units of a
variable in an equation.
Generally,
the dimension of a physical quantity is symbolized by square parenthesis
"[]".
The
function of dimensional analysis:
- Dimensional equations are used to validate the correctness of a physical equation.
- Dimensional equations are used to derive correct relationship between different physical quantities.
- Dimensional equations are used to convert one system of units to another.
- Dimensional equations are used to find the dimension of a physical constant.
The
base dimensions are:
The dimensional formula are like these:
C. Measurement
Measurement is a process of comparing the magnitude of a
physical quantity with the values which belong to a measuring devices.
There are 2 ways in doing measurement:
1) Single measurement
Using this formula:
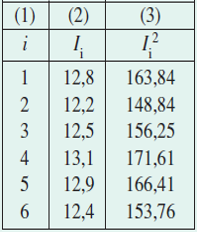
2) Repeatedly measurement
Below is the example of the measurement:

The formula:
To report the result, we use this formula:
Some measuring devices are:
Vernier caliper
A caliper can be used to measured with a precision of 0.1mm.
Consequently, the uncertainty of measurement using this caliper is the half
value of 0.1 mm, which is 0.05 mm. To measure by using caliper, you should make
the addition of main scale and nonius scale. The main scale is surpassed by the
zero scale of nonius. A caliper can be used to measure the
diameter of a thing.
Micrometer
A micrometer is used to measure with a precision of 0.01
mm which is more precise than caliper. Just like the caliper, you need to sum
up the main scale of the nonius scale.
The uncertainty of the micrometer is 0.005 mm
Uncertainty
Uncertainty greatly affects the accuracy of the measurement. The
uncertainty may occur when the equipment is incorrectly set or has never been
calibrated.
Relative Uncertainty
Sometimes we need to know how large an uncertainty of
measurement is compared to the measured value. We then define a relative
uncertainty as a fraction of uncertainty to the measured value as expressed in
the following equation:
Every measuring device has its uncertainty value. For,
micrometer and caliper they have their own uncertainty value which is
unchangeable. Here are the formula of the uncertainties measurement of the
micrometer and caliper:
* The example is on the result report of the repeatedly
measurement, but the uncertainty is depend on the measuring device.
D. Significant Figure
Significant figure are the digits of a number that are used to
express it to the required degree of accuracy, starting from the first nonzero
digit.
Significant figure rules:
- Any digit that is not zero is significant. Thus 642 has three significant figures and 6.792 has four significant figures.
- Zeros between non zero digits are significant. Thus 4023 has four significant figures.
- All numbers in scientific notation are significant figure. Thus 7.2 x10⁻⁵ has 2 significant figures
- Leading zeros are not significant. Thus, 0.00005 has 1 significant figure
- Trailing zeros in a number containing a decimal point are significant. For example, 12.2300 has six significant figures: 1, 2, 2, 3, 0 and 0.
- Trailing zeros in a number that dont contain a decimal point are significant. Thus 500 has 1 significant figure.
Multiplication and
Division
The rule of the multiplication and division is still connect to
significant figure term. In the multiplication and division, the result of them
is depend on the smallest significant figures.


Complete material..but if u dont mind,change some font color please..
ReplyDelete